Showing posts with label diy. Show all posts

Friday, August 15, 2014

Room Sneak Peak #2 - DIY Metallic Desk & Night Stand

I absolutely love the look of dark wood with light, cushy neutrals. My first 5 years here, I was able to collect a beautiful desk, nightstand, ladder bookcase and dresser in a deep cherry that all went perfectly with the vision I had for my room. My new room changed things a bit. Square-footage wise it's bigger but the ceiling isn't as high, it only has 1 window and has hard wood floors.  For some reason everything seemed a little closer together and it made the slight differences in the pieces cherry tones more noticeable, in addition to make the room feel really dark.

After some design research and treasure hunting I thought maybe a table like this would be a nice addition as my other nightstand.  It's 'neutral' and lighter than the wood pieces that seemed to weigh the place down.
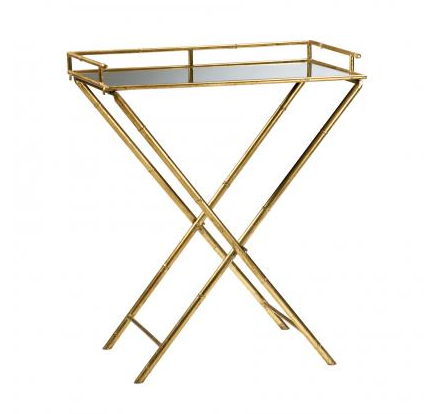
Lulu and Georgia

Sadly, with a near $600 price tag it was out of the question for now. I spent endless hours searching for a new table online, but just couldn't seem to find anything in my $100-200 price range.  Then I remembered my parents had a wrought-iron little side table that, I thought they purchased at Ikea and could easily be spray painted a metallic! I was so pleased to find the entire Vittsjo collection, I got all sorts of new ideas for my room. Since this has been in progress for over half a decade now, I made myself stick to my original vision and started out purchasing the Laptop Table ($24!!) and THIS metallic spray paint in 'champagne' that seemed to match perfectly with my curtains.


I put it together in about 20 minutes and spent maybe 10 minutes giving it 2 coats of paint. 48 hours later I had a stunning side table!


After I got it in my room, however, something still just didn't feel quite right. I decided I needed to ditch my cherry desk (that was my first adult furniture purchase & that was so proud of myself for spending hours putting together myself!) and get the Vittsjo Desk ($40!!!). It was a tough choice, but a good one and I absolutely love the finished products! All for under $100.


Friday, October 4, 2013

Adventures at Home with the Gel Manicure

I have a confession. I'm a nail biter, which is Not. Cute. My nails get short and hang-naily, plus the whole chewing aspect. I've found the best way to combat the biting and keep my nails pretty is gel manicures. At $35-50 bucks a pop it gets a little expensive to get them as much as I need them so I decided to try an at home kit. 
The Sally Hansen Insta Gel strip was on sale for about half the price of my usual mani so I snatched it up! 


The kit comes with a nail buffer, 2 sets of gel strips, nail cleansing pad, he gel top coat and the tiny UV light for drying. Replacement Gel strips run between $8 and $13, which would save you about half of what you'd be spending on salon Gels.


The steps are fairly easy. File and Buff your nails and then clean them off with the cleansing pad (which is basically an alcohol pad). It's important to get your nail as smooth and clean as possible so the strips stick. 


Next you apply the strips, nail by nail.
The strips basically feel like semi-hard nail polish. They come in several sizes and are fairly long, so size up your nail by width and press it on to your nail. They also provide and orange wood stick to smooth out the wrinkles and run along the edges to make sure it's really stuck on there. To trim the length you fold the end over the tip of your nail and press down until the strip naturally creases and rips.


Both of these steps were a lot easier than I anticipated, but I could see you having difficulty if your nails are shorter.


When you've done this to all your nails on one hand you apply the gel top coat. It's thicker and stickier than a normal top coat so be careful.

Next you put each nail 1-by-1 under the tiny LED light that came with the kit. The light is timed for 30 seconds, but it was definitely necessary to put it under twice. I probably could have done it three times just to make sure, but I got a little antsy.


All in all they came out beautiful. They were even, shiny and had the same surface 'stiffness' of the salon gels. You do need to make sure you really seal the corners with the orange stick though or they do start to look like little stickers on your nails. 

They ended up lasting me about a week, so not sure how cost effective it would be. It was also pretty tedious to do this all nail by nail. I think it took me about 45 min/hand, but it might have been because it was the first time. I haven't tried it again yet and....I'll admit, I went back to salon gels. It was worth a shot though and will definitely be worth it for any last-minute-manicure needs!